
Garden Troll…Large Version …Now Completed
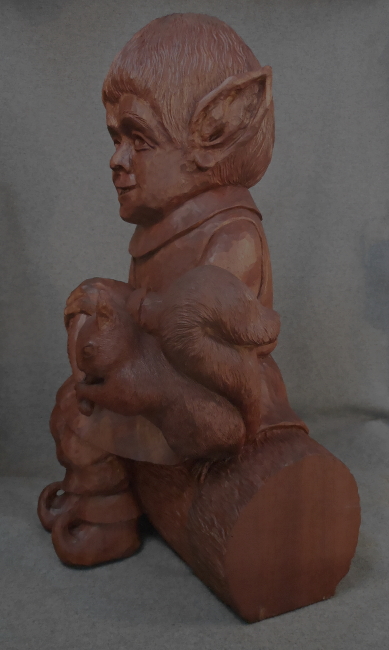
Here he is in his new home. I want to thank my clients for their patience and for allowing me to post this photo!! What a great spot for him!

9-4-14 And here he is…finished and ready to go to his new home!


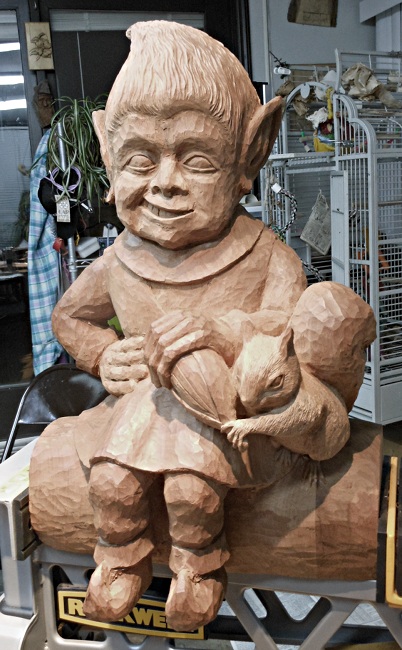
9-3-14 Well, The Garden Troll is just about finished. In this photo the stain has been applied and has yet to be wiped off and allowed to dry. He is not dry and I’ll post more photos tomorrow

Just stained! Waiting to wipe off excess stain and allow it to dry
5-27-14 Finally getting back to carving with some regularity. Sometimes life gets in the way of our best intentions.
The Garden Troll is nearing completion. You’ll notice a lot of texture in the log and on the ear of corn. Now for a few more details and some “cleaning up”.

The log is now textured as is the ear of corn.
2-8-14 I have been working on getting the squirrel completely textured…just about there now (I’m leaving the ears for now because texturing them will thin them slightly and I don’t want to break them. I’ll leave them for last.) I’ve also been “cleaning” some areas that don’t show so much, but that I want to be neat, like under and behind the legs. These areas can be hard to get at and grain doesn’t always cooperate.


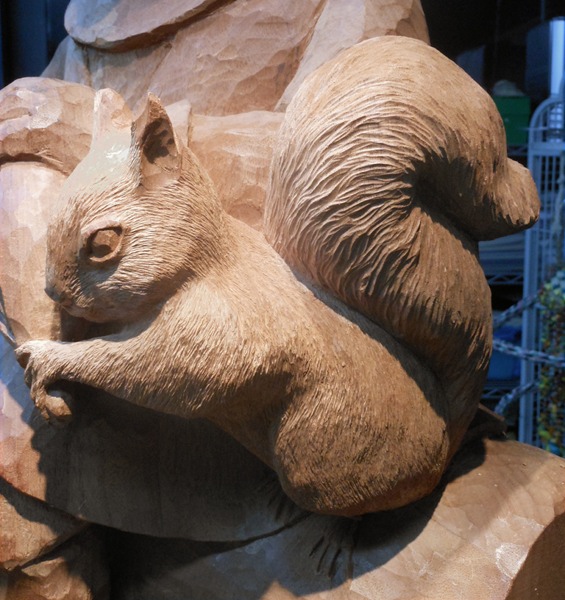
12-9-13 Again, it has been a while, but I expect updates to be more frequent now especially after the holidays. Here are the latest photos. Hair texture and squirrel fur texture have been added, along with more detailed squirrel feet


closeup of detailing on squirrel
4/24/13 More detail…getting there

3-19-13 It has been way too long since I last updated this. Life has a way of interrupting the best of intentions…but life also goes on, and I am here and ready to carve again!! I have been working on the ears and face. He’s getting there!


11-18-12 The squirrel is set now. Getting him situated in the right place, at the right angle to get his feet on the log is one of the trickiest parts of this carving.

10-21-12 More detail…working on the squirrel now.

Progress!


8-1-12 Starting to look like a troll!


7-1-12 Progress. Working around the back and one side first. There is less detail so it’s easier to keep track of what goes where. Because there are fewer features, there is also a lot more wood to remove.


5-23-12 Getting the basic shape in one dimension


5-6-12 More rough cuts.

4-24-2012
First cuts made!

First step: transfer pattern onto block of wood

4-23-2012–After a delay because of a problem with checking, I now have a new block of beautifully matched, well dried mahogany. This measures 16″ X 14″ X 24″ tall. I am anxious to get started!


Well, Mush, Not what I expected as a glue-up for this project. Just shows how much I have to learn. That must be why you’re doing large commissions, and I’m still piddlin’ with the small stuff. Good luck…… I see many hours of happy whackin’ with that mallet. Prairiejohn.
Thanks, John! You were probably picturing a piece more in line with the shape of the finished piece. I could have done that but it would have cost more…and this way I can have a little leeway…lol or a lot!…if I decide along the way to change something. This is one hard, dense chunk of mahogany!!
You go girl! 🙂
Ahhhh thanks Jud!!! I’m building muscle and burning calories. That works! 🙂
Looks great, i am planing to do one also. Looking forward to your progress pics.
Thanks, Charlie! Be sure to let me know when you post pics.
Mush- I’m not one for chain-saw carving, but I may have chosen that as the first step in making the rough-outs for something this big- and in mahogany. Tough job- you go girl.
Well, I did chainsaw a big section off the front. The problem is it’s soooo heavy, moving it around isn’t easy. I am not comfortable standing on a block of wood with a chainsaw in my hand. I kind of enjoy wielding the mallet and can actually lop off quite a bit of extra wood faster than you’d think. Thanks for your comment….appreciate it!!!